It’s the time of year for saving money!
Everyone agrees that speakers sound different. And despite past claims to the contrary from the AES and other seemingly authoritative sources, most people also agree that different electronics sound different. The one standard product that continues to be relegated to “voodoo” status, not just by the uninitiated, but even by people we would otherwise expect to be knowledgeable, is cables. People rage back and forth over whether “high performance” cables make any difference at all, and – even if they do – whether they can possibly be worth what they cost.
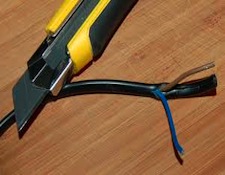 Here’s a very simple experiment that anyone can do at home that should prove to most people’s satisfaction whether cables actually influence the sound of a system and whether or not factors other than just resistance, capacitance, and inductance can influence the “sound” of a cable.
Please read this all the way through, and then TRY IT YOURSELF!
To start, first find a set of the “freebie” interconnect cables that many manufacturers of cheap electronics include in the package when you buy their equipment. Most of us have LOTS of those lying around at home, so finding a pair should be no problem. If you don’t have any or can’t find them, any cheap set of interconnects will work just fine. WARNING: This experiment calls for cutting the jackets of the cables, so DON”T use any cables that you aren’t willing to risk changing!
Once you’ve got your cables, if they are ― like “lampcord” or “zipcord” ― a “one-piece pair”, held together for most of their length by a thin plastic joiner, CUT that joiner along its full length so that you wind up with two separate cables. Then, using a razor blade or an X-Acto knife, very carefully MAKE A CIRCULAR CUT ALL THE WAY AROUND EACH CABLE’S JACKET as close to the RCA connector at each end of the cable as you can. The object is to cut all the way through the plastic jacket WITHOUT cutting (or even “nicking”) the braided (or “served”) shield under it. You should make a TOTAL OF FOUR of these circular cuts — one near each end of each of the two cables. When you have finished that, VERY CAREFULLY make a single long straight cut on each cable, running from the circular cut at one end of the cable to the circular cut at the other end of the same cable. Again, the object is to cut all the way through the plastic jacket WITHOUT cutting through or cutting into the underlying shield.
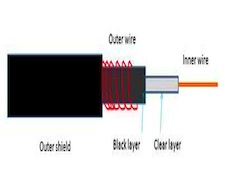 The easiest and safest way to make this long cut (and the way that’s least likely to damage the shield in the process) is, AFTER THE CIRCULAR CUTS HAVE BEEN MADE, to make a sharp bend in the cable at one of the cut points (one of the circles near the RCA connectors). This will open (widen) the cut on the side away from the bend and should cause the jacket to start to pull or lift away from the shielding at that point. Once you’ve got that lifting, use an X-acto knife with the long triangular “standard” blade (a right triangle of about 15 degrees, with the cutting edge on the hypotenuse), and insert the tip of the blade between the shield and the jacket so that the cutting edge is pointing UPWARD (toward the jacket) and the dull (non-cutting) edge is resting on the shield. Then, keeping the cable bent, just push the blade forward and your cut in the jacket will be started. If you do this correctly, AND CONTINUE TO BEND THE CABLE AS YOU CONTINUE TO CUT THE JACKET, the back (the non-cutting edge) of the blade will just slide along on the shield; the sharp cutting edge will sever the jacket without additional effort; and you’ll be able to make the long straight cut from one (circle cut) end of the cable to the other (circle cut) end of the cable quickly and easily, with no danger at all to either the shield or your fingers.
]]>MAKE THIS CUT ON BOTH CABLES. When you are finished, you should be able (with your fingers or using a pair of longnose pliers) to pull each cable’s jacket off in one long continuous strip. DO THAT. Carefully take the jacket off each of your two cables, IN ONE PIECE. Then PUT THE JACKETS BACK ON BOTH OF THEM, JUST AS YOU TOOK THEM OFF, Do this (take the jackets off and put them back on again) two or three times, until it’s easy to strip or replace the jackets and you can do it in just a few seconds, (NOTE: To make sure that you always put the same jacket back on the same end of the same cable you took it off of, it’s a good idea to mark the jackets and the connectors of your cables before the first time you take the jackets off)
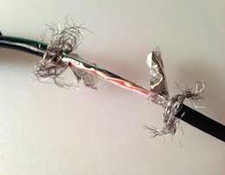 Your “test” cables are now ready, and will allow you to critically evaluate TWO VERSIONS OF THE SAME CABLE, that are of exactly the same materials; the same length; the same (except for the jackets) construction; the same resistance; the same capacitance; the same inductance; the same characteristic impedance; and even the same connectors, to determine if any differences can be heard.
Before starting your experiment, WITH THE JACKETS ON BOTH CABLES, plug them into your System, just exactly as you would if you intended to use them permanently. Let them “burn-in” for at least several hours. Then, begin the test by listening to your system (through your test cables) critically, using one or more of your favorite, very best-sounding recordings. After you have listened to everything, and believe that you are certain that you know what the System sounds-like set up that way, DOING NOTHING ELSE, AND MAKING NO OTHER CHANGES OF ANY KIND, PULL THE JACKETS OFF BOTH TEST CABLES AND LISTEN AGAIN, using exactly the same recordings played at exactly the same levels.
Then write in and tell us all what you heard. DO IT! It’s easier than it sounds, and not only will it give us all a chance to finally settle this thing, once and for all, but it will give YOU the opportunity you’ve always wanted to be a “golden-eared” reviewer with an appreciative world-wide audience.
Think of the fun you’re going to have. GO DO IT NOW!
